
How to Clip a Cat’s Nails: A Step-by-Step Guide
The actual mechanics — how to hold, how much to cut, and what to do if it doesn’t go perfectly the first time.
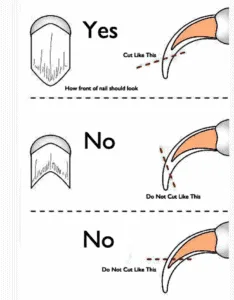
The recommended location and angle for a claw trim.
In Summary
- Only trim the tip — the pink quick inside the claw bleeds if cut, so when in doubt, cut less.
- One paw a day is a completely legitimate approach while you’re both learning.
- Kittens can start as young as 4 weeks; senior cats often need monthly trims as they wear claws down less on their own.
- Rear claws don’t retract, so without a scratching surface that lets a cat sharpen them lying on its side, they can keep growing between trims rather than wearing down naturally.
- If you do cut the quick, styptic powder and a calm response fixes it in minutes — it’s not an emergency (full steps below).
- Can’t see the quick because your cat’s claws are dark? Trim in small increments and watch for a dark dot in the cross-section — full technique below.
- Which clipper you use matters less than technique — see our clipper guides if you haven’t picked one yet.
Jump to a section:
Before You Start
A calm setup makes more difference than any particular tool. A few minutes of prep pays off:
- A clipper you’re comfortable with — see our full clipper guide if you haven’t chosen one, including a comparison table if you’re torn between styles.
- Styptic powder on hand, just in case.
- A quiet moment — not right after play, not when your cat’s already wound up.
- Treats, ready for during and after.
- A towel wrap if your cat’s especially wriggly (a “purrito” — snug but not restrictive), or a purpose-built restraint option below if you want something sturdier.
Tip
If a towel wrap doesn’t quite cut it, a cat grooming bag or restraint harness (see below) does the same job with more structure — it holds your cat snugly with one paw exposed at a time, which takes a lot of the “am I holding this right” guesswork out for a genuinely wriggly cat.
One more thing worth knowing before you start: a cat’s rear claws don’t retract the way front claws do, so a cat sharpens them differently — usually by chewing, or by lying on its side and scratching against something with the right texture and shape. If your cat doesn’t have a round scratching post so it can lie on the ground and scratch rear claws, they can keep growing without wearing down between trims and become overgrown faster than you’d expect from the front claws alone — worth checking rear claws specifically each time you trim, not just assuming they match the front.
These swaddle-style wraps and grooming bags earn their keep well beyond trim day, too — the same snug hold that stops a wriggly cat mid-clip also makes ear cleaning, brushing, and giving meds a lot less of a wrestling match, so it’s worth having one on hand even if nail trims are the only reason you’re looking today.
 View on Amazon$9.19
We earn commission if you make a purchase at no additional cost to you. See Disclosure Statement for further details....
09/24/2026 02:48 pm GMT-
View on Amazon$9.99
We earn commission if you make a purchase at no additional cost to you. See Disclosure Statement for further details....
09/24/2026 02:48 pm GMT


The Step-by-Step Trim
This close-up shows the recommended location to cut your cat’s claws.
If you’d like to see the technique in motion before trying it yourself, this vet-led demonstration covers handling and the actual cut in real time:
- Get comfortable first. Sit with your cat in your lap or beside you, facing away from you slightly — this keeps their paws accessible without feeling cornered.
- Press gently on the paw pad to extend the claw. Most cats do this reflexively once you apply light pressure just behind the toe.
- Find the quick. It’s the pink triangular section visible near the base of the claw — you’re cutting well clear of it, only the clear/white tip beyond. On dark or black claws, the quick usually isn’t visible at all — see the tip below.
- Cut at an angle, following the natural curve of the claw, not straight across.
- One clean squeeze. A single confident cut is cleaner than hesitating halfway through — a slow, tentative cut is what actually crushes the nail.
- Move to the next claw, or stop here for today. Both are fine.
Tip
Doing one paw a day — or even one claw a session for a nervous cat — is a completely legitimate approach. There’s no rule that says all ten (or eighteen) have to happen in one sitting.
Trimming Dark or Black Claws
If your cat’s claws are dark or black, you won’t be able to see the pink quick the way you can on lighter claws — so trim in small increments rather than one confident cut. Take off a thin sliver, check the cut end: once you see a small dark or greyish dot appear in the centre of the cross-section, stop, because that’s the quick starting to show through. A bright torch or phone light held behind the claw can also help the quick show up as a faint pink shadow on some cats, though it doesn’t work for everyone. When in doubt, trim less and do another pass another day.
Kittens and Senior Cats
Trimming a Kitten’s Claws
You can start as early as 4 weeks, then every 2–3 weeks as they grow. Early positive experiences matter — wear long sleeves (kitten claws are sharp and they’re squirmy), have a warm towel ready, and keep sessions short. Some owners do one paw per day specifically to keep each session brief while the kitten is still learning to tolerate handling.
Trimming a Senior Cat’s Claws
Older cats are often less active, so their claws don’t wear down naturally the way an active cat’s do — monthly trims are usually needed. Arthritis can make handling more sensitive, so go slower, support joints gently rather than gripping the paw firmly, and watch for signs of discomfort.
See Also
This is one piece of a bigger picture — see every senior-cat and kitten guide on the site in one place.
If You Cut the Quick
It happens to almost every owner eventually — the quick is the pink blood vessel inside the nail, and it’s easy to misjudge on a wriggly cat or a dark claw. It’s not an emergency, but it does sting, and there’s a right way to handle it.
If You Accidentally Cut the Quick
Stay calm — your cat will take their emotional cue from you. Apply styptic powder or a styptic pencil to the nail tip and press gently for 30–60 seconds. Cornstarch or flour works in a pinch if you don’t have styptic powder on hand, though it’s slower to stop the bleeding. If bleeding doesn’t stop within a few minutes, or your cat seems very distressed, contact your vet. This is general guidance, not a substitute for veterinary advice — if you’re ever unsure, a quick call for guidance is always the right move.
It’s worth keeping styptic powder wherever you store your clippers, precisely so it’s on hand before you need it rather than something you’re hunting for mid-trim.

Frequently Asked Questions
A relaxed lap-hold with the cat facing slightly away from you works for most cats. For a wriggly one, a snug towel wrap (“purrito”) leaves one paw exposed at a time without your cat feeling grabbed.
Just the clear or white tip — never into the pink quick. When unsure, trim less than you think you need to; you can always take a bit more next time.
Build up gradually over several days — just handling and gently pressing paws, with treats, before you ever bring the clipper out. If that’s still a struggle, claw caps or a vet/groomer trim are both reasonable alternatives — see our claw caps guide. A professional trim is usually inexpensive (roughly $10–20 at a groomer, or often free/low-cost added onto a routine vet visit), so it’s a perfectly reasonable option while you build up to doing it yourself, or permanently if your cat truly won’t tolerate it from you.
Whatever your cat tolerates calmly — one paw, a few claws, or all of them. There’s no requirement to finish in one go.
Rear claws don’t retract, so they wear down through a different motion — chewing, or scratching while lying on their side — rather than the sheath-shedding scratch front claws get. Without the right surface to scratch that way, rear claws can genuinely overgrow faster than front ones, so check them separately at each trim.
Trim in small increments instead of one cut, checking the cross-section each time — a small dark dot appearing in the centre means you’re getting close to the quick and should stop. A bright light held behind the claw can help on some cats. See the tip in the step-by-step section above for the full technique.